

How To Create Neon Effect In Photoshop
Creating a Neon Glow Light Style in Photoshop
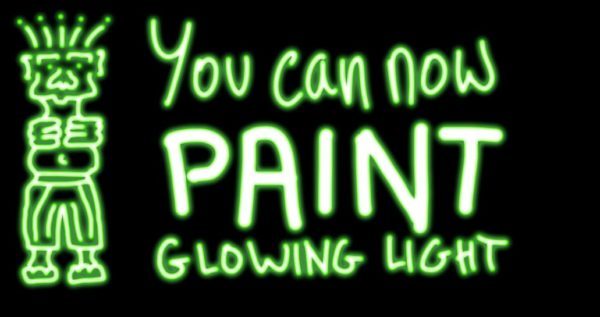
It's easy to create this glowing Layer Style, which will enable you to make any layer appear to be lit up like neon. Even better, once you've made the style you can then paint with glowing light on any layer to which it has been applied.
Step 1: Paint a design
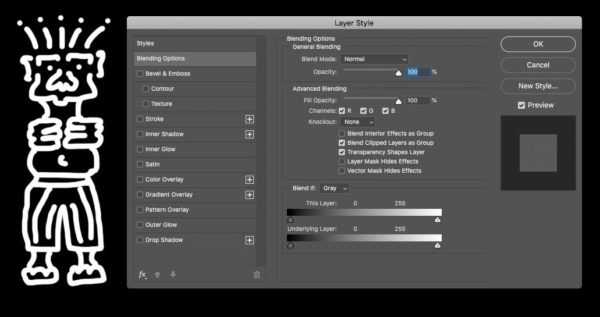
Fill the background layer with black, then make a new layer and paint on it in white, using a small, hard-edged brush. I've painted a totem figure I've painted on the left so you can see the style build up. Then double-click the layer in the Layers Panel to open the Layer Style dialog.
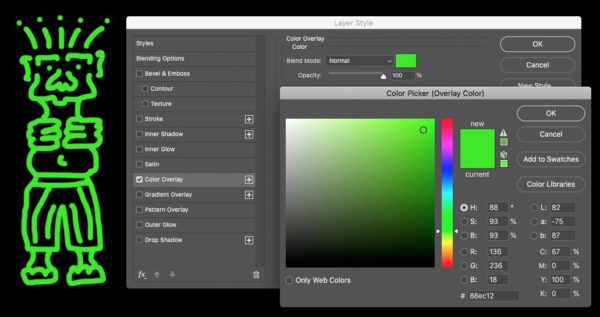
Step 2: Add a color
Go to the section named Color Overlay, and tick its checkbox to make it active. Click the color swatch at the top, and choose a bright, vivid color from the Color Picker when it appears. You'll see the white brushstrokes change to that color. Click OK to close the Color Picker.
More after the jump! Continue reading below ↓
Free and Premium members see fewer ads! Sign up and log-in today.
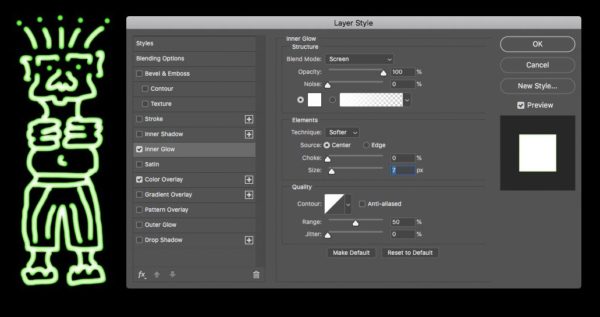
Step 3: Add an inner glow
Go to the Inner Glow section, and tick its checkbox. With the Source button set to Center, gradually increase the size until you get a white glow in the middle of your brushstrokes. For small brushes, like the one used here, a size of between five and 10 pixels should work well.
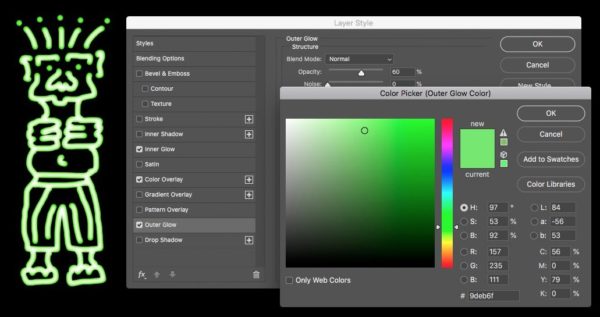
Step 4: Add an outer glow
Go to the Outer Glow section, and tick it. Click on the color swatch again and choose a similar color to the one you chose in step 2 – perhaps slightly brighter – and click OK to close the Color Picker.
Step 5: Set the glow amount
You'll now need to set both the Spread (the thickness of the glow) and the Size (the glow's softness). In this example, I used a Spread of 7% and a Size of 14px, but it depends on the size of brush you used when you first drew your design. Click OK to apply the style to the layer.

Step 6: Start painting
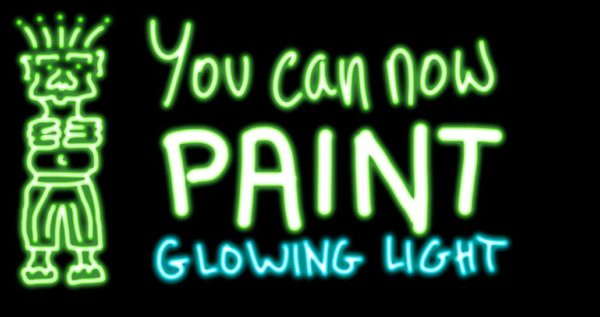
You can now paint on your layer, and the design you paint will have the glow you made attached to it. If you increase the brush size, as I've done with the word 'Paint', then you'll see a much brighter amount of internal glow – and we'll fix that shortly.
Step 7: Change the colors
You can change the colors of the glow by cutting some of your design to a new layer, or by deleting it and redrawing it on a new layer. Copy the style to the new layer, by holding Option/Alt as you drag it from the old layer to this one. You'll then need to modify the colors you set for the Inner Glow and the Outer Glow to whatever new colors you choose.
Step 8: Change the Inner Glow radius
I've cut the word 'Paint' to a new layer, and changed its color. Because the brush stroke is much thicker, the Inner Glow needs modifying: double-click the Inner Glow entry in the Layers Panel for the new layer to open its dialog. Here, I've changed the Inner Glow value from 7px to 14px to suit the larger stroke.

Step 9: Save the style
If you click the button marked New Style in the Layer Style dialog, you can save the style so that you can apply it to a layer in a new document – you'll find it in your Styles panel. If you save glows in different colors, it will save you having to change the colors manually later.
How To Create Neon Effect In Photoshop
Source: https://creativepro.com/creating-neon-glow-light-style-in-photoshop/
Posted by: williamsherat1979.blogspot.com
0 Response to "How To Create Neon Effect In Photoshop"
Post a Comment